> For the complete documentation index, see [llms.txt](https://usermanuals.geojit.com/llms.txt). Markdown versions of documentation pages are available by appending `.md` to page URLs; this page is available as [Markdown](https://usermanuals.geojit.com/fundsgenie-mobile/profile.md).
# Profile
Take a quick look at your profile here
This Section Contains :
* [How to View Your Profile ?](#how-to-view-your-profile)
* [How to Add/Edit Nominee ?](#how-to-add-edit-nominee)
* [How to Opt Out of Nomination ?](#how-to-opt-out-of-nomination)
* [How to Retake Risk Assessment ?](#how-to-retake-risk-assessment)
* [How do I view my SIPs ?](#how-do-i-view-my-sips)
* [How to Create Mandates ?](#how-to-create-a-mandate)
* [How to see Transaction history ?](#how-to-see-transaction-history-and-folio-updates)
* [Folio Updations](#how-to-see-transaction-history-and-folio-updates-1)
* [How to Change Your Password ?](#how-to-change-your-password)
* [How to enable TOTP Login ?](#how-to-enable-totp-login)
* [How to enable Biometric Login ?](#how-to-enable-biometric-login)
* [How to Logout ?](#how-to-logout)
#### How to View Your Profile ?
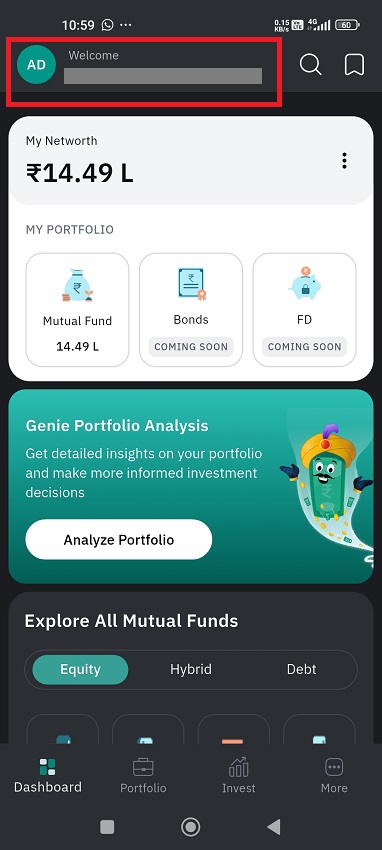
* Once you **Login**, you will by default land on the **Dashboard page**.
* On the **top** of the page, you can see **your name** and its abbreviation.
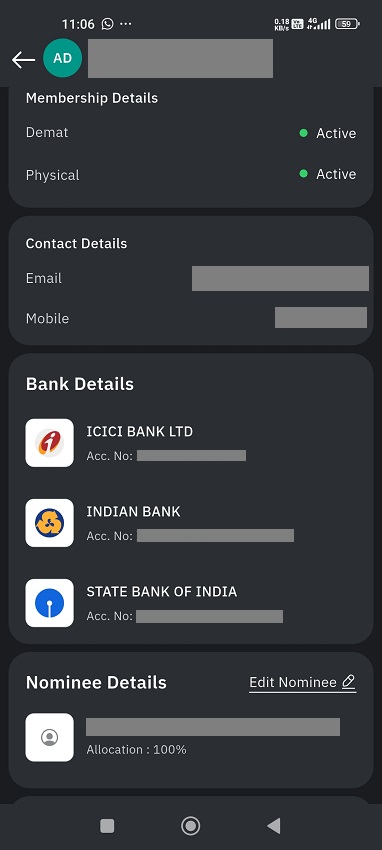
* **Tap on your name**, and your **profile page** will **open** up.
* Here, you can see your **membership details** (demat/physical), **Contact details**, **Bank details**, **nominee details**, **your risk profile**, **My SIP**s, **Mandates**, **Transactions**, **Folio Updations**, **Settings** and **Logout** button.
#### How to Add/Edit Nominee ?
* In the **My Profile page**, scroll down to spot '**Nominee Details**.'
* Tap on the '**Edit Nominee**' button.
* You can **edit** the nominee details by clicking on the '**pencil icon**'
* You can **set the allocation percentage** here.
* Once you have edited the details, click on the **Save button .**
* If you want to add a new nominee, tap on the '**Add Nominee**' button.
* Enter the details like **name**, **relationship**, **DOB**, and **allocation percentage.**
* Click on '**Save**.'
* Now your nominee details are added successfully.
* Next, select how the nominee details should be displayed in your holding statement :
* Name
* Status
* Once done, click on the **'Confirm'** button.
* An **OTP authentication** window will pop up, where you will have to **enter the OTP** received in your registered mobile number.
* Once you have entered the **OTP** correctly, **click 'Submit,**' and your nominee details will be updated successfully.
* You can also **delete** a nominee by clicking on the '**recycle bin'** icon given on the **top right corner.**
* **Click Confirm** and **enter the OTP**.
#### How to Opt Out of Nomination ?
If you don't wish to set a nominee, you can opt out of nomination. For this,
* In the **My Profile page**, scroll down to spot '**Nominee Details**.'
* Tap on the '**Add** **nominee**' button.
* Enter the relevant details.
* Check the /'**Opt out of nomination.'**
* Click on **Save.**
* An **OTP authentication** window will pop up, where you will have to **enter the OTP** received on your registered mobile number.
* Once you have entered the **OTP** correctly, **click 'Submit,**' and you will be opted out of adding a nominee for your investment.
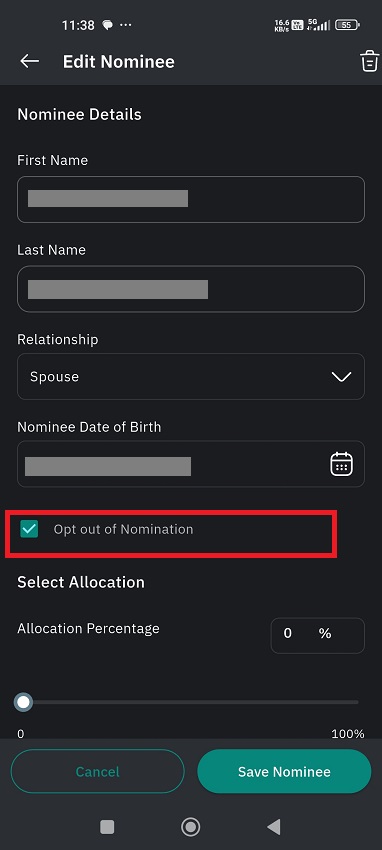
* If you wish to opt out of the nomination of an already-added nominee, click on the **edit icon** .
* Check the '**Opt out of nomination.'**
* Click on **Save.**
* An **OTP authentication** window will pop up, where you will have to **enter the OTP** received on your registered mobile number.
* Once you have entered the **OTP** correctly, **click 'Submit,**' and you will be opted out of adding a nominee for your investment.
#### How to Complete and Take a Risk Assessment?
As per regulatory requirements, completion of the Risk Assessment is mandatory prior to making any Mutual Fund investment. Until the assessment is completed, only redemption transactions will be permitted, and new investment orders will remain restricted.
* In the **My Profile page**, scroll down to see the 'Know Your Investment Suitability and Risk Profile' section and click on the **'Take assessment'** button.
* Answer eight questions, and the genie will give you your risk assessment result.
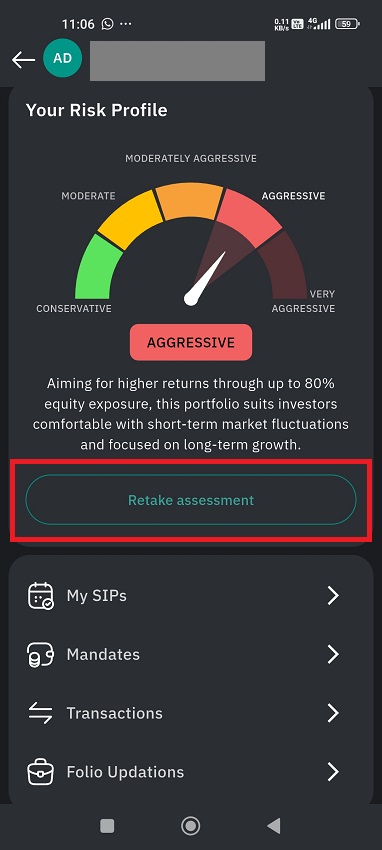
#### Retake Risk Assessment
* In the **My Profile** page, scroll down to see the **'Retake assessment**' button.
* Answer eight questions, and the genie will give you your **risk assessment result**.
#### How do I view my SIPs ?
* Once you **log in**, you will by default land on the **Dashboard page**.
* On the **top** of the page, you can see **your name** and its abbreviation.
* **Tap on your name**, and your **profile page** will **open** up.
* Scroll down to see '**MY SIPs**', and click on it.
* Here you can see all your **active, paused, completed,** and **cancelled** SIPs.
* If you have active SIPs, then the **number of active SIPs**, the **total monthly SIP amount**, and the **deduction date** marked in the SIP calendar can be seen.
* Just below this summary, the funds in which you have SIP will also be listed out, which carry the **fund name**, **SIP amount**, **SIP date,** and **number of installments** made on **total installments**.
* Click on any of your holdings, and you can see the **monthly SIP amount**, **Total Investment**, **number of Installments, SIP start date, SIP date, SIP end date,** and **mandate details**.
* Your past installments will be listed out under this tab, with the most recent transaction located at the top.
The respective details are available in the paused, completed, and cancelled SIP sections too.
#### How to Create a Mandate?
Mandate removes the hassle of recurring manual payment. Once a mandate is created, your SIP amount will be automatically deducted from your account. Approved mandates can be canceled anytime, instantly.
To create a new mandate, follow the below steps:
* Once you **Login**, you will by default land on the **Dashboard page**.
* On the **top** of the page, you can see **your name** and its abbreviation.
* **Tap on your name**, and your **profile page** will **open** up.
* Scroll down to see '**Mandates**', and click on it.
* You will by default land on the **Active Mandate** section. Under this, you can know the status of your mandate—whether approved or pending.
* Towards the end of this page, there will be a '**Create Mandate**' button. Click on it, and you will be navigated to the **Mandate Setup**.
* Enter the mandate amount.
* Select a bank account for the mandate creation.
* Enter **Proceed**.
* You will be redirected to the bank page for mandate registration. Please don't press back.
* An authentication page will appear. **Click on 'Send Code to Email.'**
* Enter the **security code** received in your **registered email**.
* **Click on Submit**.
* Your **active/inactive mandates** will be displayed under the Mandates section.
> You can create a mandate under the NRO status.
#### How to see Transaction history ?
You can also view your Transaction history from this page.
* Once you **Login**, you will by default land on the **Dashboard page**.
* On the **top** of the page, you can see **your name** and its abbreviation.
* **Tap on your name**, and your **profile page** will **open** up.
* Scroll down to find **'Transactions'**.
* Click on it and you will be **navigated to the order summary** page.
* Here, all your transactions will be classified as - completed, in progress and failed.
#### Folio updation
For folio updation, follow the below steps :
* Once you **Login**, you will by default land on the **Dashboard page**.
* On the **top** of the page, you can see **your name** and its abbreviation.
* **Tap on your name**, and your **profile page** will **open** up.
* Scroll down to find '**Folio Updation**'.
* Click on it and you will be navigated to the 'Folio Updation' page.
* Choose an option from the drop-down menu of **'Folio Update For'.**
* Next, select a **physical folio** from the drop-down menu.
* Once done, click on the **'Submit'** button.
> - For **physical folios**, contact each AMC/RTA and request a status change from **Resident** to **NRO**.
> - For **demat folios**, collect RO DEMAT CML and coordinate with MF BO team, for tax status change in RTA .
#### How to Change Your Password ?
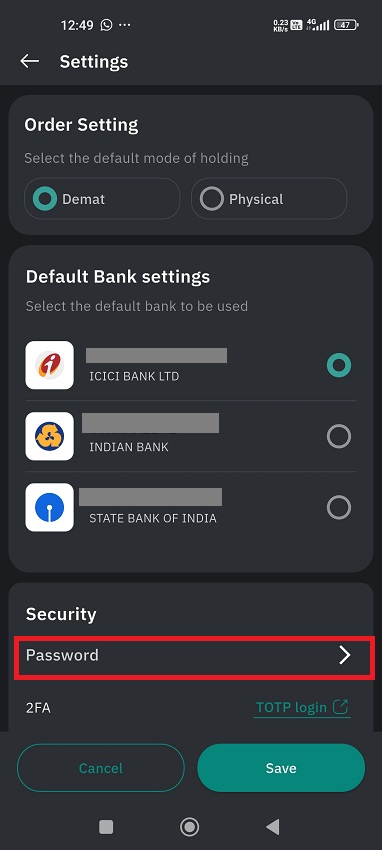
* **Tap on** the '**Settings**' button in **My Profile**.
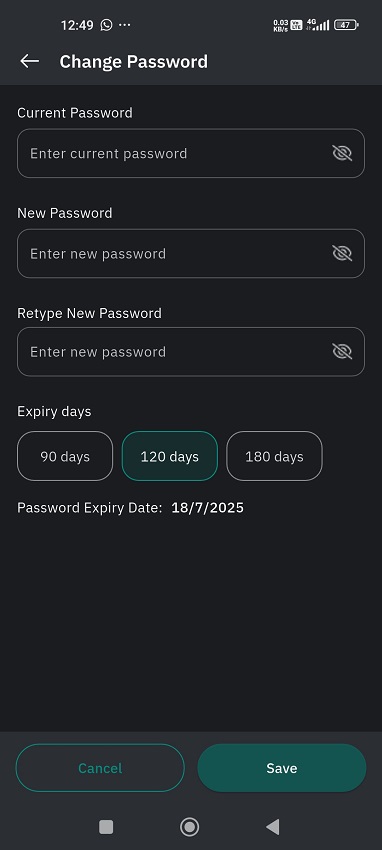
* Under 'Security,' you will see '**Password**.' Tap on it.
* Enter your **Current Password**, **New password,** and **Retype** **new password**.
* Select the **Expiry Date** and click on **Save**.
#### How to enable TOTP Login ?
* Tap on the '**Settings**' button in My Profile.
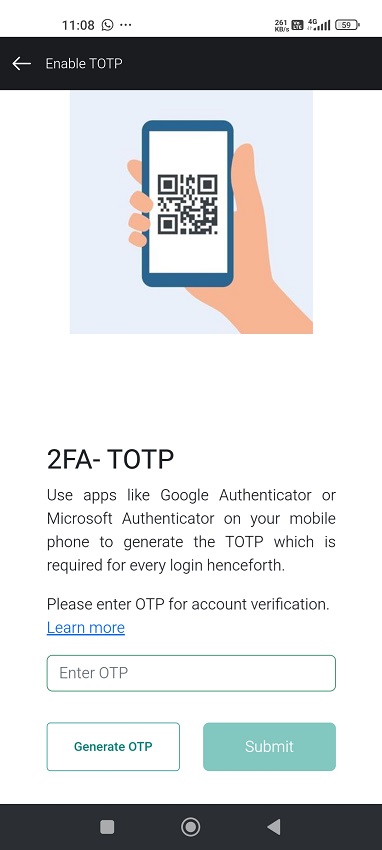
* Under '**Security**,' you will see **2FA**—Two Factor Authentication.
* Tap on the **TOTP** login button given right next to it.
* You will be navigated to another page where you'll need to enter OTP for account verification.
* Click on '**Generate OTP**.'
* Click on **Submit**.
* **Copy the key** or **scan the displayed QR** code using the authenticator app on your mobile phone.
* **Enter** the **login** **password**.
* Enter the 6-digit TOTP given in the authenticator app.
* Click on **Enable**, and you are done.
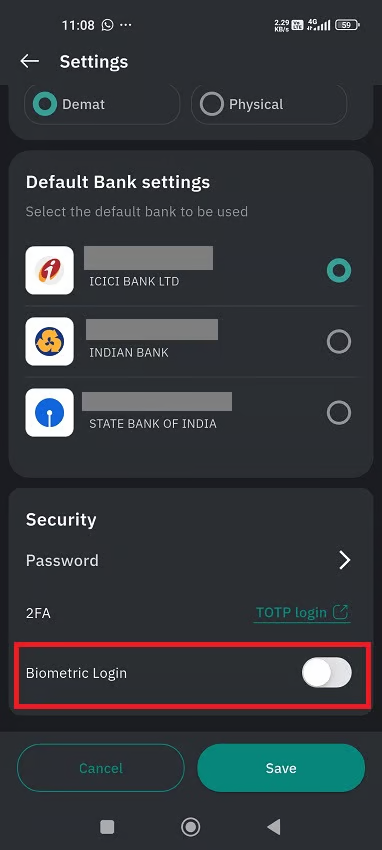
#### How to enable Biometric Login ?
* Tap on the **'Settings'** button in My Profile.
* Under '**Security**,' you will see '**Biometric Login'**.
* Use the **toggle button** to turn on/off Biometric login.
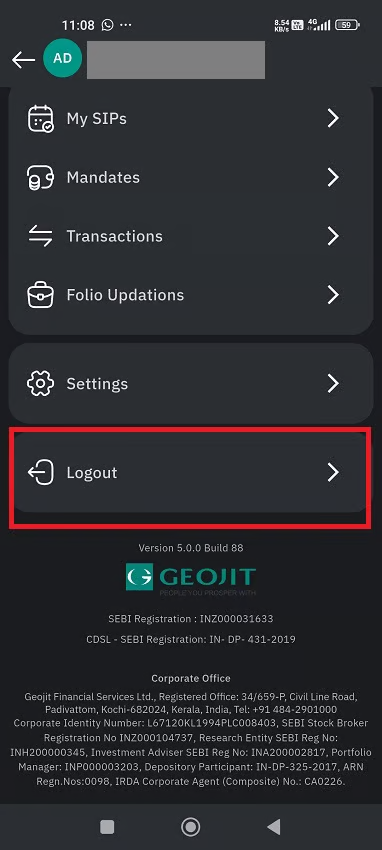
#### How to Logout ?
* Once you log in, you will by default land on the **Dashboard page**.
* On the top of the page, you can see **your name** and its abbreviation.
* **Tap on your name**, and your profile page will open up.
* **Scroll down** towards the end, and you will see the '**Logout**' button.
* **Tap on it** and you will be logged out.
 * You can **set the allocation percentage** here.
* Once you have edited the details, click on the **Save button .**
* If you want to add a new nominee, tap on the '**Add Nominee**' button.
* Enter the details like **name**, **relationship**, **DOB**, and **allocation percentage.**
* Click on '**Save**.'
* Now your nominee details are added successfully.
* Next, select how the nominee details should be displayed in your holding statement :
* Name
* Status
* Once done, click on the **'Confirm'** button.
* An **OTP authentication** window will pop up, where you will have to **enter the OTP** received in your registered mobile number.
* Once you have entered the **OTP** correctly, **click 'Submit,**' and your nominee details will be updated successfully.
* You can also **delete** a nominee by clicking on the '**recycle bin'**
* You can **set the allocation percentage** here.
* Once you have edited the details, click on the **Save button .**
* If you want to add a new nominee, tap on the '**Add Nominee**' button.
* Enter the details like **name**, **relationship**, **DOB**, and **allocation percentage.**
* Click on '**Save**.'
* Now your nominee details are added successfully.
* Next, select how the nominee details should be displayed in your holding statement :
* Name
* Status
* Once done, click on the **'Confirm'** button.
* An **OTP authentication** window will pop up, where you will have to **enter the OTP** received in your registered mobile number.
* Once you have entered the **OTP** correctly, **click 'Submit,**' and your nominee details will be updated successfully.
* You can also **delete** a nominee by clicking on the '**recycle bin'** 
 .
* Check the
.
* Check the  '**Opt out of nomination.'**
* Click on **Save.**
* An **OTP authentication** window will pop up, where you will have to **enter the OTP** received on your registered mobile number.
* Once you have entered the **OTP** correctly, **click 'Submit,**' and you will be opted out of adding a nominee for your investment.
'**Opt out of nomination.'**
* Click on **Save.**
* An **OTP authentication** window will pop up, where you will have to **enter the OTP** received on your registered mobile number.
* Once you have entered the **OTP** correctly, **click 'Submit,**' and you will be opted out of adding a nominee for your investment.

.png?alt=media&token=3b689944-487e-44e4-8d7b-50cc69cdfbcc)